
Contents
Professional Ecommerce Product Photo Editing Services
You’ve likely spent hours arranging lighting and snapping photos, yet your product shots still look “off” compared to the polished images on top-tier websites. This frustration is common among new sellers, but the problem rarely lies with your camera. Online, your customer cannot pick up an item to check the texture or quality; their eyes do all the heavy lifting. If the visual presentation feels amateur, the customer assumes the brand is too.
Take a pair of leather boots as a practical example. A raw photo might capture the shape, but a cluttered background or dim lighting obscures the grain of the leather, making the product look used or cheap. Professional ecommerce product photo editing services do more than just clean up a picture; they build visual trust. By removing distractions and correcting colors, editing ensures the customer focuses entirely on the value of what you are selling, not the table it was sitting on.
Bridging this gap between a raw snapshot and a trustworthy listing is essential for growth. Market data consistently suggests that high-quality product images increase conversion rates by eliminating the doubts that prevent a shopper from clicking “Add to Cart.” Turning good photos into professional assets is a strategic investment in your sales performance.
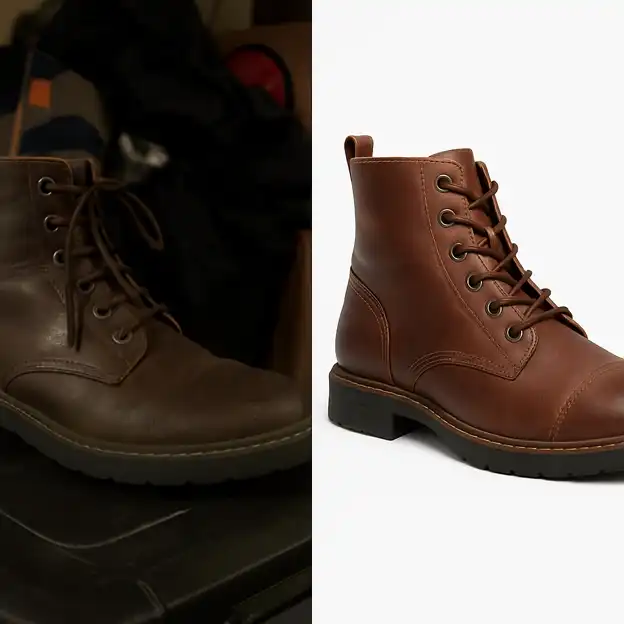
Removing Distractions with Background Removal: The ‘Digital Scissor’ Technique for a Clean Look
Imagine walking into a store where the shelves are cluttered with random objects; it’s hard to focus on what is actually for sale. Your product photos function the same way. When you snap a picture on your dining table, the surrounding noise distracts the buyer. Background removal tools for online sellers provide a quick fix. We use a technique called a “clipping path”—essentially a pair of precise digital scissors—to cut your item out of the original photo, isolating it completely.
Major marketplaces don’t just prefer this clean look; they often mandate it. Clipping path services for high-volume ecommerce ensure your images meet these strict requirements by creating a transparent background (often saved as a PNG file) that sits perfectly on pure white. This industry standard is used because:
- It forces the buyer’s eye directly to the product without visual friction.
- Amazon and eBay algorithms favor white backgrounds for better search visibility.
- High-contrast images look significantly clearer on small mobile screens.
Removing the background makes your shop look cohesive, instantly building trust with hesitant shoppers. However, a stark white background can sometimes make lighting inconsistencies more obvious. Professional product image retouching goes beyond just cutting out the image; next, we need to ensure the colors on screen match exactly what arrives in the mail.
From Dull to Dazzling: How Color Correction Prevents Costly Customer Returns
Nothing hurts an online store’s reputation faster than a customer opening a package and saying, “This isn’t the color I ordered.” Lighting conditions in your home studio—whether it’s warm living room bulbs or cool morning window light—often tint your photos in ways your eyes naturally ignore. Professional photo editing fixes this “white balance” issue, ensuring that the teal sweater on the screen matches the physical fabric exactly. Accurate representation significantly lowers your return rates and keeps reviews positive.
While vibrant social media filters make products pop, they often distort reality and harm buyer trust. Color correction techniques for ecommerce images are not about making a product look “better” than it is; they are about calibrating the image to standard lighting so the buyer sees the real item. Editors adjust specific color channels to neutralize unwanted casts, which is vital when you need to show variety, ensuring a red version of a sneaker looks consistent with the blue version next to it.
Maintaining this uniformity across your entire catalog is what separates a garage sale vibe from a polished brand. Product image optimization involves verifying that every SKU displays the correct hue, saturation, and brightness, regardless of when or where the photo was taken. Once you have mastered accurate color, the next challenge is giving your clothing shape and volume without distracting the viewer with a plastic prop or awkward hanger.
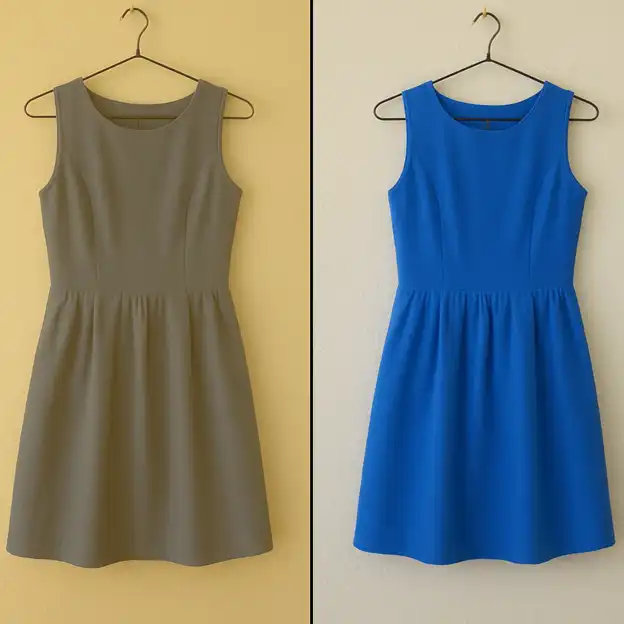
Creating the Invisible Model: Why the Ghost Mannequin Effect is a Must for Apparel
Clothes often look lifeless when laid flat or draped over a hanger, failing to show the customer how the fabric actually falls. To give online shoppers a better sense of fit, the ghost mannequin effect for apparel photography creates a hollow, 3D shape that mimics a body without the distraction of a model. This technique—often called the “invisible man”—allows the viewer to see the inside of the collar and the natural drape of the hem simultaneously, offering a premium look that boosts buyer confidence.
Achieving this result isn’t magic; it requires a specific shooting process before any ecommerce photography services touch the files. Editors create this illusion by composite stitching multiple photos of the same item, so you must capture the right raw materials:
- Photograph the garment on a mannequin to establish the shape and fit.
- Remove the item and photograph the inside neck label on a flat surface or foam board.
- Capture the back view to ensure the silhouette is complete.
Merging these shots removes the mannequin entirely, leaving you with a polished image that focuses solely on the design. While this type of product photo editing provides essential volume, the item may still look slightly unnatural if it appears to hover in mid-air.
Adding Depth with Shadow Creation: Making Your Products Look Real, Not Floating
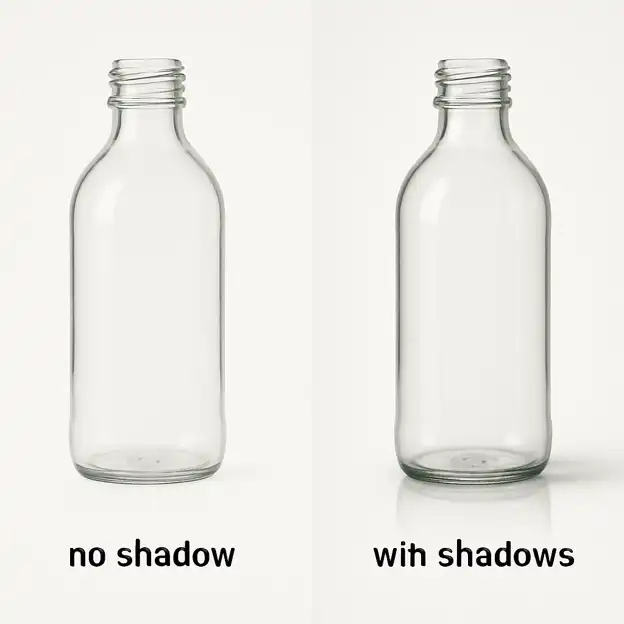
Even the most perfectly cut-out product can look fake if it appears to float in a white void. Without a visual anchor, customers subconsciously perceive the item as lightweight or digitally inserted, rather than a tangible object they could hold. Professional image editing solutions fix this by adding shadows back into the frame, a process known as “grounding.” This subtle adjustment tricks the eye into seeing weight and presence, instantly making a sneaker look sturdy or a bottle of lotion look premium.
Choosing the right style of shadow depends entirely on the vibe of your store. A “natural shadow” or “drop shadow” mimics standard lighting, appearing as if the item was photographed on a matte table, which works well for clothing and shoes. Alternatively, shadow creation services for realistic product shots can generate a “reflection shadow,” which creates a mirror-like effect beneath the object. This is standard for luxury items like jewelry, sunglasses, or cosmetics because it implies the product is sitting on a high-end glass counter.
While shadows add depth, they must be applied consistently across your entire catalog to maintain a cohesive brand identity. If one photo has a glossy reflection and the next has a soft blur, your store will look disorganized. Reliable photo enhancement services ensure every angle matches, solidifying customer trust. Once your product is effectively grounded, the final step involves zooming in to perfect the surface texture itself.
Cleaning Up the Details: How Dust and Scratch Removal Saves Your Brand Reputation
Modern marketplaces like Amazon or Etsy allow customers to inspect goods closer than they could in a physical store. When a shopper hovers their mouse over your image to check the material, tiny imperfections like stray lint, fingerprints, or manufacturing dust become glaring distractions. Professional product image retouching acts as a digital polish, removing these microscopic flaws so the viewer focuses entirely on the quality of your item, not the cleanliness of your studio.
While basic editing adjusts general lighting or color, retouching specifically targets the surface texture to create that coveted “brand new” look. This step involves smoothing out minor scuffs on leather boots or digitally wiping away smudges on glass candle jars that the camera lens magnified. High-quality photo enhancement services tackle these issues pixel by pixel, elevating a standard product into something that feels premium and untouched, giving small brands the same visual polish as major retailers.
Cleaning your physical product before shooting is always best, but even the most careful photographers can’t prevent every speck of dust from settling under bright lights. Relying on product image optimization allows you to salvage an otherwise perfect shot without reshooting, ensuring your inventory looks flawless. Once your catalog looks pristine, the question shifts from “how do I fix this” to whether doing it yourself is actually worth the time.
The ROI of Outsourcing: Why Paying $2 per Photo is Cheaper Than Doing It Yourself
Many new sellers view editing fees as an unnecessary expense, but the true price tag lies in the hours you lose doing it yourself. If you value your time at just $25 an hour, spending an entire afternoon tweaking backgrounds effectively costs you hundreds of dollars—money that could have been invested in marketing or sourcing new inventory. The real cost of outsourcing product photo editing goes beyond the invoice price; it is about recognizing the opportunities you sacrifice by staying stuck behind a computer screen instead of growing your business.
Establishing an efficient product photo editing workflow for small businesses often comes down to choosing the right tool for the volume. While the debate of automated AI photo editors vs professional editors is common, software often misses the subtle details—like consistent drop shadows or complex jewelry reflections—that human experts perfect. Consider the math on a typical batch of 50 product images:
- DIY Editing: 50 photos × 10 minutes each = 8.3 hours of labor (Cost @ $25/hr: $208)
- Outsourcing: 50 photos × $1.50 per image = $75 flat fee (Time cost: 0 hours)
- The Gain: You save $133 instantly and reclaim a full workday.
The “break-even” point happens much earlier than most entrepreneurs expect. Once you have more than ten items to list, the mental energy saved by handing off technical work allows you to focus on sales strategy rather than pixel peeping. With your time reclaimed and your budget validated, the final step is simply ensuring your raw images are formatted correctly to ensure a seamless hand-off.
Preparing Your Files for Shopify and Amazon: The Fast Path to a Live Store
Your online store requires specific dimensions to ensure customers can zoom in on product details without the picture becoming blurry. When learning how to optimize product images for Amazon or Shopify, the industry standard is usually a square image around 2000 pixels wide. This “safe zone” size allows shoppers to inspect fine textures, like the grain of a leather wallet or stitching on a shirt, while keeping the file size manageable. Balancing size and quality is the first technical hurdle every new seller must clear to look professional.
Speed matters just as much as clarity because nearly half of mobile shoppers abandon sites that take more than three seconds to load. The impact of image resolution on website load speed is significant, so you must use “compression” to reduce the file’s weight without ruining its visual quality. Think of this like vacuum-packing clothes for a trip; the shirt looks the same when you wear it, but it takes up far less space in the trunk. Proper compression ensures your beautiful product shots appear instantly on a customer’s phone rather than leaving them waiting on a loading screen.
File names also act as critical signposts that help search engines guide customers to your products. Renaming generic camera files like “IMG_5902.jpg” to descriptive terms like “blue-ceramic-flower-vase.jpg” is one of the most vital steps to prepare images for Shopify store success. This simple habit, often called optimizing “Alt text,” helps Google understand exactly what you are selling. With your files now sized, compressed, and named for discovery, you are ready to lock in a repeatable routine that keeps your business growing.
Your 3-Step Action Plan to Professional Ecommerce Imagery
You no longer have to choose between spending hours fixing shadows or settling for images that hurt your sales. By outsourcing the technical heavy lifting, you reclaim time to focus on growth while ensuring your storefront looks trustworthy. Professional ecommerce product photo editing services are the accessible lever you need to turn casual browsers into confident buyers.
- Audit your storefront: Identify the five listings with the poorest lighting or distracting backgrounds to upgrade first.
- Test the waters: Request a “free trial” edit to see exactly what professional retouching does for your specific items.
- Plan for growth: Set a routine for batch image processing for online retailers so your inventory never bottlenecks.
Don’t let mediocre visuals be the barrier to your success. Knowing how to choose the best photo editing partner is simply about finding a team that values your time as much as you do. Start your trial today and elevate your brand from a side project to a serious competitor.